Stop Rotting Seeds: Presprout Sugar Snap Peas Successfully for a Bountiful Harvest
There’s nothing more frustrating for a gardener than the anticipation of a thriving crop, only to find that your carefully planted seeds have succumbed to the soil before they even had a chance. This common setback, particularly with legumes like sugar snap peas, often leads to wasted time, effort, and a significant delay in your gardening schedule. The good news? You can virtually eliminate this heartache and guarantee a robust start for your pea plants with a simple, yet incredibly effective technique: presprouting. This guide will walk you through
how to presprout sugar snap peas, ensuring your seeds transform into vigorous seedlings ready to produce an abundance of delicious, crisp pods.
Why Presprouting Sugar Snap Peas is a Game-Changer
Presprouting isn't just a gardening "hack"; it's a foundational step that addresses several common challenges associated with direct sowing sugar snap peas. By taking your peas through the initial germination phase indoors, you gain critical control over their early development, leading to a significantly higher success rate.
The primary culprit behind failed pea crops is often
rotting seeds. Pea seeds are susceptible to rot when exposed to cold, wet soil for extended periods before they can germinate. Early spring temperatures, while signaling the ideal planting window for peas, can fluctuate dramatically, leaving seeds vulnerable. Presprouting bypasses this risk entirely. By germinating your seeds in a warm, controlled environment, you protect them from adverse outdoor conditions and ensure they develop the vital root system needed to thrive once planted.
Beyond preventing rot, presprouting offers a multitude of benefits:
*
Guaranteed Viability: You'll only plant seeds that have already proven they can sprout. This eliminates the guesswork of whether a seed is viable, saving you valuable garden space and preventing the need for frustrating re-plantings.
*
Early Head Start: Your seedlings will be ready to tackle the garden environment sooner. This can shave days, or even a week, off their initial growth phase, potentially leading to an earlier and more prolific harvest.
*
Efficient Resource Use: No more planting extra seeds "just in case." Knowing your seeds are viable means you can space them precisely, maximizing your garden's productivity without over-seeding.
*
Maximized Yield: A strong start translates to healthier, more robust plants capable of producing more pounds of those sweet, crunchy sugar snap peas you love.
We've personally relied on this quick and easy method for years, consistently achieving successful sugar snap pea harvests, often twice a year! If you're looking for a comprehensive overview of boosting your pea yields, don't miss our guide on
Presprout Sugar Snap Peas: Your Guide to a Bountiful Harvest.
The Easy Method: How to Presprout Sugar Snap Peas Step-by-Step
Presprouting sugar snap peas is a straightforward process that requires minimal supplies and effort. Here's our tried-and-true method:
1.
The Initial Soak: Begin by dropping your sugar snap pea seeds into a bowl of room-temperature water. Let them soak for anywhere from 4 to 8 hours. This softens the seed coat, signaling to the embryo inside that it's time to wake up and begin the germination process. Avoid soaking for much longer than 8 hours, as excessive soaking can sometimes lead to rot.
2.
Prepare the Nursery: Take a full sheet of paper towel. Lightly dampen it – you want it wet enough to cling to itself, but not dripping. Lay your pea seeds gently in the middle of the damp paper towel, ensuring they have a little space between them. Fold the paper towel around the peas, creating an "envelope" or a neat package. If your paper towel is thick, you might only need one layer for wrapping.
3.
Create the Incubation Chamber: Carefully place your paper towel-wrapped peas into a plastic Ziploc bag or a covered container. The goal here is to create a mini-greenhouse effect, maintaining consistent humidity and warmth. Seal the bag or container, leaving a tiny crack for minimal air exchange.
4.
Daily Check-Up: Place your sealed bag or container in a warm spot, ideally between 65-75°F (18-24°C). Check on your peas daily. It's crucial that the paper towel remains consistently damp. If you notice it drying out, add a few drops of water – just enough to re-moisten without saturating. Over-watering can lead to mold or rot even at this stage.
5.
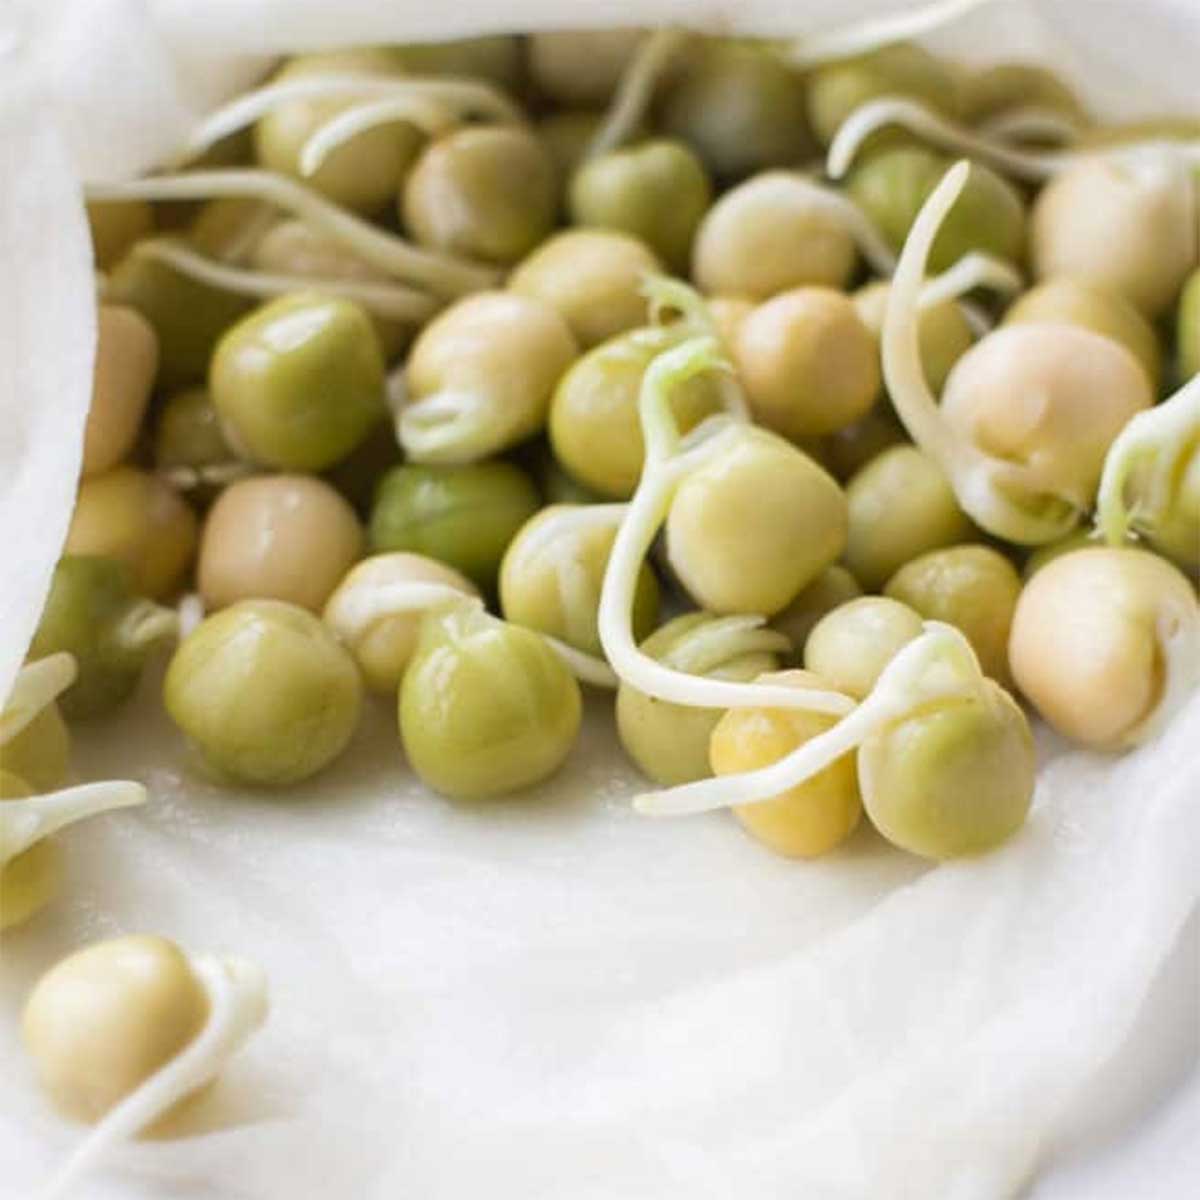
Observe for Sprouts: Patience is a virtue, but often a short one in this case! Sugar snap peas are relatively quick to sprout. On average, you should see tiny white roots (radicles) emerging from the seeds within 3-4 days. These roots will look like small, white tails. Once you see these roots, your peas are officially presprouted and ready for planting! Don't wait for green shoots to appear, as the root is the primary indicator of successful germination at this stage.
Planting Your Presprouted Peas for Optimal Growth
Once your sugar snap pea seeds have successfully sprouted, it's time to transfer them to their permanent home in your garden. This critical step ensures their continued development into healthy, productive plants.
*
Timing is Key: Plant your presprouted peas directly into your garden beds or containers as soon as you see the roots emerge. Avoid letting the roots grow too long in the paper towel, as they can become tangled and fragile, making planting more difficult. Peas thrive in cool weather, so aim to plant them in early spring as soon as the soil is workable, typically 4-6 weeks before the last expected frost, or in late summer for a fall harvest.
*
Prepare the Soil: Sugar snap peas prefer well-draining soil rich in organic matter. Dig a shallow trench, about 1-2 inches deep, in your prepared garden bed. For best results, consider adding a good quality inoculant to your pea seeds just before planting. Pea inoculants contain beneficial bacteria (Rhizobium leguminosarum) that form a symbiotic relationship with pea roots, helping them "fix" nitrogen from the air directly into the soil. This natural fertilization boosts plant vigor and yield significantly, reducing the need for synthetic nitrogen fertilizers. Simply sprinkle the inoculant powder over your presprouted peas just before placing them in the trench, ensuring they are coated. This is an essential step for robust growth and higher yields. We consider using a good inoculant a non-negotiable step for healthy, productive pea plants.
*
Gentle Placement: Carefully place your presprouted peas into the trench, spacing them about 3 inches apart. Handle them gently to avoid damaging the delicate new roots.
*
Cover and Water: Gently cover the peas with soil, pressing down lightly with your hands to ensure good seed-to-soil contact. Finish by thoroughly watering the newly planted trench. This helps settle the soil around the seeds and provides initial moisture.
*
The Anticipation: Now comes the exciting waiting game! You've given your peas the best possible start. Within about a week, you'll start to see the first tiny green shoots "pop" through the soil. This is a truly rewarding moment for any gardener, and once the first one appears, the rest will quickly follow suit.
Beyond Presprouting: Care Tips for a Bountiful Harvest
While presprouting provides an undeniable advantage, ongoing care is still essential for a truly bountiful sugar snap pea harvest.
*
Provide Support: Sugar snap peas are climbing plants and will quickly need something to grow on. Install trellises, netting, or stakes at planting time or shortly after. This prevents sprawling, improves air circulation, and makes harvesting much easier.
*
Consistent Moisture: Peas need consistent moisture, especially during flowering and pod development. Aim for about 1 inch of water per week, either from rainfall or irrigation. Avoid letting the soil dry out completely.
*
Weed Control: Keep the area around your pea plants free of weeds, as they compete for water and nutrients. Mulching can help suppress weeds and retain soil moisture.
*
Pest & Disease Watch: Keep an eye out for common pea pests like aphids or diseases like powdery mildew. Early detection and organic solutions can often prevent widespread issues.
*
Harvesting Success: Begin harvesting sugar snap peas when the pods are plump, crisp, and bright green. The more you pick, the more the plants will produce, extending your harvest season. Enjoy them fresh, or learn how to preserve them for year-round enjoyment. For more detailed instructions on guaranteeing your crop, check out
Guarantee Your Crop: Easy Sugar Snap Pea Presprouting Method.
Conclusion
Presprouting sugar snap peas is a simple, yet profoundly impactful technique that transforms seed-starting from a gamble into a reliable success. By investing a few days in this easy indoor process, you proactively prevent seed rot, confirm viability, and give your plants a robust head start. The result? A healthier garden, a more efficient use of your time and resources, and, most importantly, pounds of crisp, sweet sugar snap peas waiting to be picked and enjoyed. Say goodbye to rotting seeds and hello to your most abundant sugar snap pea harvest yet!